
Teacher Student Data Link, what in the world is that? Just what
it sounds like, a way to link
student data to teachers and viceversa. This process applies only
to youngsters.
Here is the explanation from the CEPI website.
The Teacher Student Data Link Collection (TSDL) in the Michigan Student Data System will
report links between students and the teacher(s) who provide instruction to them. These data
are necessary to meet the requirements of the American Recovery and Reinvestment Act (ARRA)
and the America Competes Act as part of the State Fiscal Stabilization Fund. A workgroup
composed of intermediate school district, local education agency, public school academy,
and Michigan Department of Education (MDE) representatives developed the schema for this collection.
This is a full-year collection. Reported data reflect the student's performance in classes taken
throughout the current academic year and the status of his/her academic report at the end of the
school year. It is the Center for Educational Performance and Information's intent to open this
collection in early May in order to enable district authorized users to begin early reporting, in
case their districts will be closed for the summer. The collection will remain open through
August 31, so summer course information can be included in the collection.
To get started this first time, there are several
things you must do. In broad terms, you must assemble
a list of all of your teachers and obtain their Personnel Identification Code (PIC)
which you obtain
via the Registry of Educational Personnel (REP). You will need to take a look at
your Course Catalog
and assign a Class Type identifier and a Standard Course Code as guided by the
Secondary School
Course Classification System: School Codes for the Exchange of Data also known
as the NCES.
Also you will need to review your Course Offerings for all semesters in the
2010-2011 school year
and update them with the teacher PIC and a couple other bits of information.
Somewhere along the line
you will need to assign a Completion Code to each student's class as part of the
Final Grade.
When those tasks have been accomplished you can run the TSDL extraction process
and create
an export file ready for upload to CEPI. STUREC©
will treat this as an 'Other Collection.'
Let's review what will be needed...
That's it, just five broad steps. We will break them
down into chewable chunks and see how
STUREC© will help you through the process. You should complete the
first four steps in the order given.
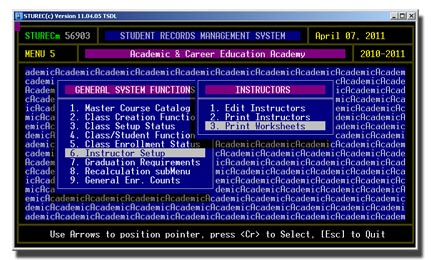
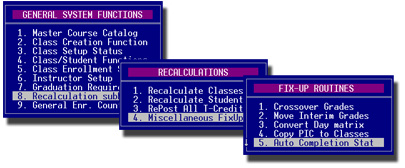
Let's start at the new Menu Item on the number 5 General Systems Functions
menu, Item 6. Instructor
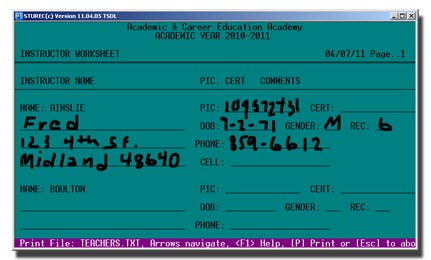
Setup option 3. Print Worksheets This option
will look through all of your active classes for this year
and produce a
worksheet with the names of your
current instructors and reminders of the data you need
to gather. It will look
like this...
Now you can go back to Menu:5.6.Instructor Setup and select
1. Edit Instructors and
fill in the information for Fred.
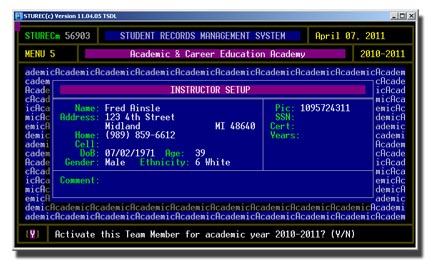
Answer Yes to activate the team member for the current year. In future years
all you will need do is activate
each teacher for the current year, and edit any data that may have changed.
There is no current requirement
to maintain any data other than the teacher's Name and PIC (Personnel
Identification Code), the other stuff
is optional and up to you locally. However,
STUREC© requires that you at least enter their Date of Birth,
Gender and Ethnicity. We know that sooner or later you will
also be required to maintain Teaching Credential
License Number and REP assignment codes for each teacher, so you
may as well get in the habit of obtaining
and entering this data too. Also we
just learned that sooner or later you will be expected to maintain the ability
to cross-reference your teachers
and classes based on their REP
assignment codes and class content. More fun.
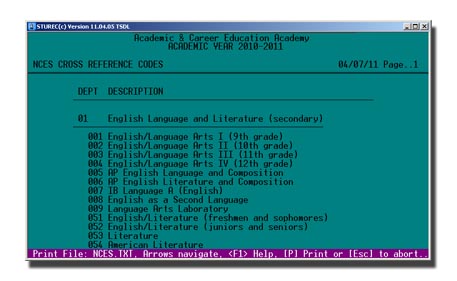
Next, go back to Menu:5.1. Master Course Catalog and you may want to print
out the 3. SCED Cross-
Reference
list because our next task will be to assign one of these NCES-SCED Xref codes to each
of your
Academic Classes.

Here is what that report will look like. It will be printed on 29 pages and
contain 1,400 items, so you should
have no problem matching up an NCES-SCED code to each of your classes.
To make that job go a little easier, print out a Course Catalog from
Menu:5.1.2 and answer Yes when
asked if you would like to print as a "Worksheet" style. You
will get something like this.
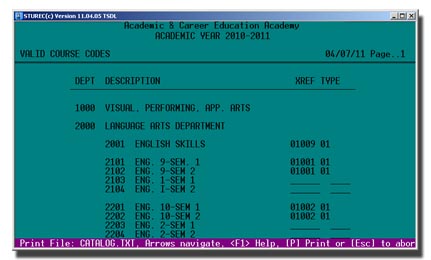
Use this as a worksheet to get all of your codes assigned. When you get
to entering the data into
the catalog screen, you will need to know what "Type" each class
is. Here is the list of appropriate
Types.
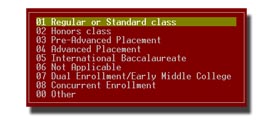
Each class must be tagged with one of these types. Most of your classes will
probably be Type "01"
Regular or Standard class. You and your district staff must decide how to interpret and apply these
codes.
Now you can go into Menu:5.1.1. Edit Course Catalog.
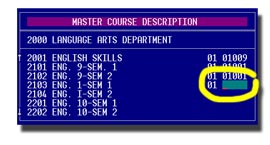
For each course that will be taught, you must assign a Class Type and the
appropriate NCES-SCED cross-
reference code. The cross-reference code consists of a two digit Department Code
or Subject Area Code,
in the case of
the English or Language department it is "01" then followed by the
actual class content code.
STUREC© will first ask you for the Class
Type then jump over and ask you for the Subject Area Code.
These two data are required this year. Then the cursor will move over and you will be
asked for the course
content
code. This was optional for year 2010-2011, but is required for 2011-2012 and
beyond. If you want
to enter it you may put in one or more
numbers, a question
mark for help
or you may type the first three letters
of a course name. Doing this will sort
the list by name, if you enter a
number the list will be sorted by number
(Course Code). If you get
flabbergasted, just press the Escape key.
For this example
the course content code is "001", so combined with the department code, you need to
enter "01001". If
you and your staff work through the "Worksheet"
before you start entering data into the
computer, you will have an easy time of
it. For this first collection you are only required to enter the Class
Type and the Department Code or Subject Area Code. The three digit Course
Content Code is optional
for this year, but will be required in the future.
When you have finished entering all of the cross reference code, run
Menu:5.1.2. Print Course Catalog
again and double check your work. Errors caught now will not come back to
haunt you later.
Here is a little routine we put in to help you jump-start the Class Setup business...
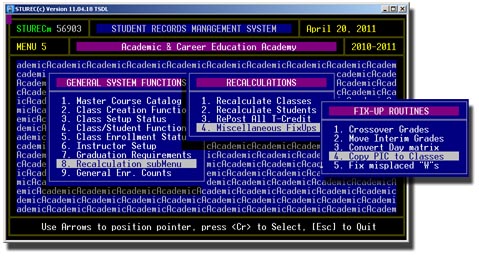
Just perform Menu:5.8.4.4. Copy PIC to Classes and let STUREC© do
a little magic. It will go through
the current year class setup records and try and match the assigned teacher name
into the Teacher Registry
If it finds a match, and assuming you spelled the name the same, it will
copy the teacher's PIC to the master
Class Setup record. This will save you a lot of time. Then when you are
editing the classes (below), all you
need do is check to make sure the correct teacher is assigned and add a
second teacher if appropriate.
Ok, that takes care of the first two items on our list, now we can get into
updating our Class Registry.
That's Menu:5.2. Class Creation Function to us STURECers. Let's look at
the new data entry screen.
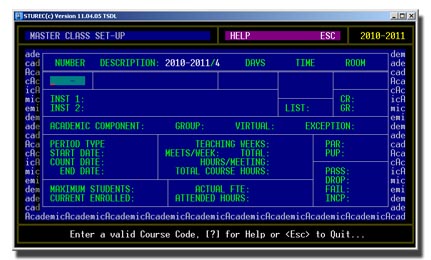
Right away you will notice a couple new things. There is now room for two
instructors and there is a new item
VIRTUAL. There is also an invisible item called MENTOR that is associated
with an instructor. There are
also four new items in the bottom right hand corner. PASS, DROP, FAIL,
INCP which are pretty self
explanatory.
Let's see what it looks like filled in.
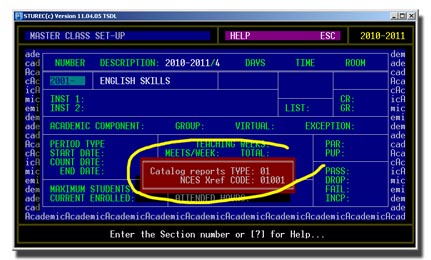
Here is something else that is new. As soon as you enter the course code you
will see whether that course
has been setup in the Catalog, and which codes have been assigned. Those codes
will not remain on the
screen, but are secure in the master catalog. Here is what a typical class
setup might look like.
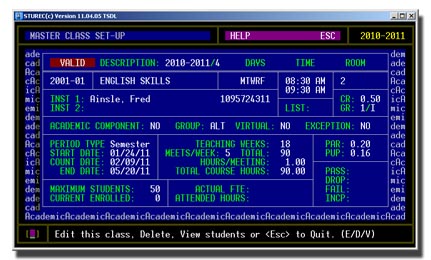
This data entry screen behaves as most STUREC©
data entry screens behave. Read the message box
at the bottom for guidance along the way. For instance, when you get to the
Instructor area you will be
asked for a PIC. If you have it, type it in and it will be verified, or you can
enter a question mark or you
may begin typing all or part of a Last Name, just part of a name or part of a
name and a question mark
and you will see a quick look-up list to select from.
If the class is a "Virtual Delivery" type class then you will also
be asked if the teacher will be serving in a
"Mentor" capacity for this class. You and your district need to
figure out what Virtual Delivery classes and
Mentors mean in your situation.
To start with, only visit your 'Learning Labs' or 'Learning Block' classes,
those that begin with a zero. If you
do just the labs first, then you can run Menu:5.8.1. Recalculate Classes
and STUREC© will find all of the
Academic Components and fix them up with the teacher PIC from the block setup
record. Nifty, eh? Do this
for all semesters you have setup for this year.
Here is a new report that should be helpful in this new process. Find it at Menu:5.3.8 TSDL Data Status.
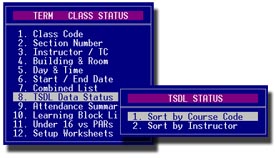
This report can be obtained four ways. First you may select a single
enrollment period or the whole year.
Next choice is to have the report sorted by the course code or the instructor.
Unfortunately, until you get
your teachers assigned the report sorted by teacher may look a little weird.
Ok, what's left? Now that you have your master course catalog populated with
the Course Type and NCES-
SCED Cross Reference codes, your teacher roster built and all the academic classes
have teachers assigned, all you
have left to do in the 'setup' process, is to assign Completion Codes to all of
your youngster's classes. You can
do this via the Grade Input screen at Menu:3.2. Input Grades or through the individual
Student Data Screen.
The process and outcome is the same in either place.
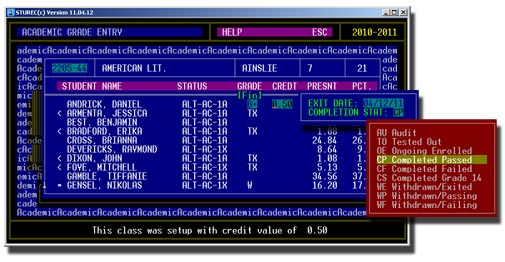
Enter the Grade and Credit as you always have and a new data box will pop-up
asking for confirmation
of the Exit Date (defaults to the current date or the last day of class,
whichever is earlier) and the
Completion Status. STUREC© will guess at
the completion status based on the final grade. If the Final
grade is A..D then "CP" Completed Passed will be selected. If the
grade is E or For U then "CF" will be
selected. If the final grade is W then "WE" Withdrawn Exited
will be chosen and if the final grade is
TX then "WE" will also be chosen. Completion Status of
"I" is appropriate if the final grade is "I". Even
though the TSDL collection will allow you to submit a class record with an
empty grade, STUREC© does
not like that and will not include empty Final grades in the TSDL extraction.
Use "I" Incomplete instead.
Remember, the Completion
Status refers to the student's status in
relation to this one class on the exit date
only. The codes "OE" and
"CS" are to only be used with students
coded as Grade or Setting of "14"
Special Ed. If you disagree with the completion status code
that has been 'guessed'
by STUREC©,
then simply press the question
mark and select whatever you think is appropriate.
If you are a fan of STUREC©'s helpful 'Automagical'
routines, you may want to try this for all those
previous classes that already have final grades, but no Completion Status
codes...
This routine will go through all of the student class records for the
currently selected school year and
apply the rules as described in the paragraph above to insert Completion Status
codes for all class
records that have a Final grade and the Completion Status is empty.
Now that you have . . .
. . . you are ready to Perform the TSDL Export Process found at Menu:7.5.1.7.5.
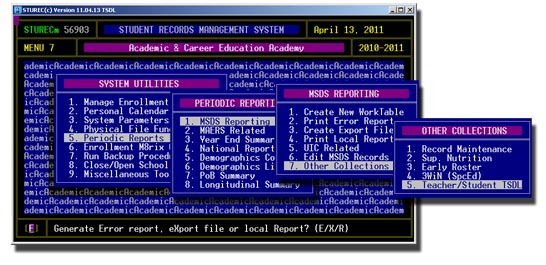
You will be asked if you would like to generate an Error Report or Create the
eXport file. We better find
out where we stand, so print an Error report first. The report will look something
like this.
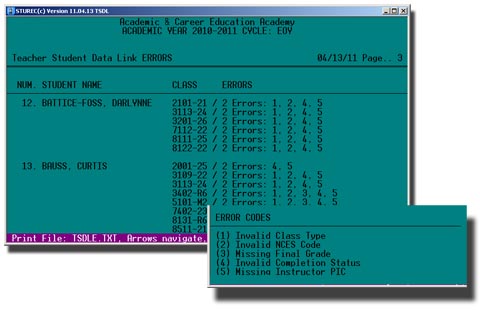
Since this export covers the entire academic year, the report does also. It
lists the student name, class,
section and enrollment period. The goal is to have all of the classes say
"Ok" instead of Errors <something>.
Let's review. Error 1. Invalid Class Type and Error 2. Invalid NCES Code are
corrected in the Master
Course Catalog. Remember that we do not need the complete NCES-SCED code this
time around, so error 2
will not occur. Actually Error 1 will not occur either because if you
forgot to enter a Class Type, STUREC©
will 'default' "01" for you. Errors 3. Missing Final Grade and
4. Invalid Completion
Status are corrected
in the
Student Data Screen | CR | G or Menu:3.2. Input Grades. Error 5. Missing
Instructor PIC is corrected
in the Class Registry at Menu:5.2. Class Creation Function. Missing PIC errors
should be corrected when
you run Menu:5.8.1.Recalculate Classes. Perform these steps in the order
suggested and you should not
have many errors to correct at all.
Once you have satisfied yourself that you have corrected all correctable
errors, go back into Menu:7.5.1.7.5.
and press "X" to create the eXport file then run the local Report. The
export file will be written to the Export
folder and cleverly named with "TeacherStudentDataLink" as part of its
name.
** WARNING ** Editorial content ahead...
Get some help and input from you local district on assigning Final Grades and
Completion Status if you are
uncomfortable with some of this. Your district may be evaluated on the contents
of this collection. Pay attention
to details and make sure that you do as clean a job as possible. Don't let
yourself be blamed if someone else
does not like the report. Honesty is the best policy. This is new to all of us.
Let's work together to do it right!
** End Editorial content.
Now, wasn't that fun!
Everyone, click here
to download the Update that includes the new TSDL Modules. It is still named Sr04New.exe
and the
run-time program is still Sr04.exe so you will not need to change your desktop icon. Install it the same
way
by double-clicking on Sr04new.exe
in the Sturec folder.