
Home >
Help >
Student Schedules
Once you have a student schedule on the screen in the Student Data Screen, there are lots of things you can do with that schedule.
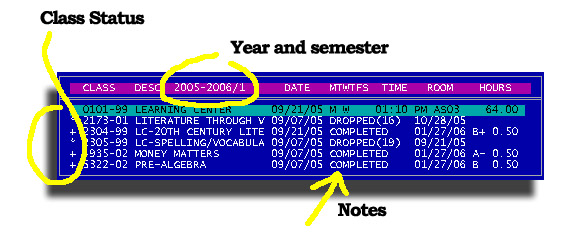
First of all, you can see several things from this initial screen. The year and semester postitively identifies the schedule as to date range. In the left column there may be a number of symbols that have special meaning relative to the status of individual classes.
[ ] No symbol (blank) indicates that the class is
currently active.
[*] the Asterisk indicates that a class has been dropped, and
there should be a note to that effect with the drop reason and date.
[<] the Left Arrow indicates that the student has
transferred out of the class.
[>] the Right Arrow indicates that the student transferred
into this class from another.
[+] the Plus Sign indicates that the class is completed and
there should be a note to that effect, a date, grade and credit earned.
[W] the letter W indicates that the student is on a Waiting
List for this class
The message box at the bottom of the screen suggests a few things you actually can do with or to this schedule.

The up and down arrow move the pointer and the [Enter] will put you into Edit mode for the highlighted class. Here are all of the action codes available
[+] the Plus Sign will allow you to add new classes or
learning labs.
[-] the Minus Sign will allow you to Drop the class and give
a drop reason and date. If you are not sure of the date, use the day after the
last day they actually attended.
[Z] the letter Z will allow you to completely Zap a class.
Permanently erased, not just dropped but gone forever.
[P] the letter P will let you print the schedule. There are
four styles available here.
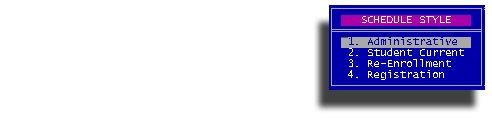
The Administrative style will print all classes the student has been involved in
including dropped, transferred and completed.
The Student Current style will print only the classes the student is currently
active as of a target date you provide.
A Re-Enrollment form may be handy for second semester. It will show the current
classes with lines to hand enter new classes.
A Registration form prints the student name and address stuff, but has lines
below to write the new classes.
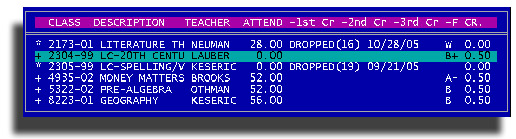
[A] the letter A will display the Attendance for all classes

Use the Control key in combination with the Left or Right arrow keys to scroll
the attendance display left or right. The "ABS" column shows the
number of absences for the entire semester. "ABSENT" is the hours
absent. "PRESNT" is the number of hours present and the
"PCT" is the percentage of present hours to total hours scheduled. By
pressing the Enter key, you may edit the highlighted class attendance. When you
press the Escape key to close the attendance display, you will be asked if you
want to Print the attendance. Answer Yes, and you will be asked for a date
range.

A note about the option "Date Range". Don't try to outsmart STUREC(c)
and try to define a date range outside of the beginning and ending dates of the
semester that is currently focused.
[/] the right Slash key is used to inititate a transfer
from one regular class to another. Learning labs cannot be transferred and
academic components within learning labs cannot be transferred, only regular or
standard classes may be transferred.
[C] the letter C is used as one way to Early Complete
a class. It actually enters the grade edit function, but puts you directly into
the Final grade where you will enter the letter grade earned, any credit earned
and an ending date. The ending date in this case will probably be earlier than
the ending date of the class.
[T] the letter T will take you to the Tuition module.Just
follow the prompts at the bottom of the screen to use this.
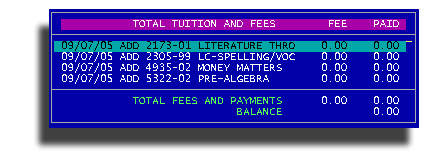
You may create Tuition records for any student, not just those coded as
Enrichment or funing code PVT (Private).
[G] the letter G will put you into the Grade module where you
may enter Interim grades or final grades
Other options within the grade module are to Post to the transcript and print a
Report card.
[R] the letter R will take you directly to the Report card setup and print process without going through the Grades module.
[V] the letter V puts you into the new Class Progress Review module.